Konova

Thursday, January 31, 2013

Feb 3, 2013 - evasi0n 6.x Untethered Jailbreak

Get ready guys! The jailbreak that you are waiting for is coming this Sunday! Check evasi0n.com !


Requirements

  • 5 minutes of your time!
  • A computer, running Windows (XP minimum), Mac OS X (10.5 minimum) or Linux (x86 / x86_64)
  • An iPhone, iPad or iPod running iOS 6.0 through 6.1 (you may check in Settings / General / About => Version)
  • A USB cable to connect the device to the computer


Wednesday, January 30, 2013

[Ordered] - NEW Panasonic QE-TM101-K wireless Charge Pad (Black)


Ordered this on Jan. 25, 2013.
Price: USD 66.99 Free shipping to Malaysia.

Here's the tracking as of today.


Tuesday, January 29, 2013

[How-To] - Protect root after an OTA

If you apply the OTA to a rooted stock ROM, you will lose root every time. In order yo keep root after an OTA, use something like OTA Rootkeeper (available in Play Store) or just reflash the root zip in custom recovery after flashing the OTA.

Untethered Jailbreak - Confirmed Its Safe to Upgrade iOS 6.1

As tweeted and confirmed by @Musclenerd, its safe to upgrade to iOS 6.1.


The untethered Jailbreak for iOS 6.1 will be available this Sunday. Here is a full list of every device eligible for the upcoming iOS 6.1 untethered jailbreak:

  • iPhone 3GS 
  • iPhone 4 
  • iPad 2 
  • iPod touch 4th generation 
  • iPhone 4S 
  • iPad 3 
  • iPod touch 5th generation
  • iPhone 5 
  • iPad mini 
  • iPad 4 
  • Apple TV 2

Monday, January 28, 2013

[How-To] - Use Cloud (Dropbox) with KeePassDroid

I have been using KeePassX for many years and couldn't find the suitable app  for my mobile device.
I have found this with KeePassDroid for my Android Nexus 4.The new Dropbox Android app plays nicely with KeePassDroid. I use Dropbox to synchronize my keepass database, because it is available on all of the platforms I use daily: Mac OS X and Android. It's very easy to use.

I install it on my desktop first, and move my keepass database into my dropbox.

Then, fire up the Dropbox Android app, and log in:


Navigate to your database and click on it:


It will jump to the password screen in KeePassDroid:


In the background the Dropbox app will be waiting to see if you make changes to the database. If you do, it will upload your changes back to your Dropbox. Now you can save and make changes to the database on your desktop, it will sync to the Dropbox and will instantly make changes to your Android later.

Home Switcher / Manager

One way to switch launcher is by using a Home Switcher app.

After 4 days of Using Nexus 4 (Nexus 4 vs iPhone 5)


I bought a Nexus 4 on Jan. 24, and this will be my 4 th day using an Android device. This is not my first device using Android because I have used the first Galaxy Note last year but it only lasts about 4 months.
However, I have an urged to get another one when Google released its Jelly Bean and Nexus 4. It was a difficult choice because I am hardcore Apple iPhone user. But still, I have my reasons for choosing Nexus 4 mainly because I am getting bored with the current iPhone 5 with the inability to Jailbreak iOS 6 (and never will).
People have asked me - "how long it will lasts this time?". I smiled... This might be different from what I initially thought. Below are my reasons:-

Price - Affordable Device

A 16 GB Nexus 4 costs about RM 1649 and iPhone 5 of that configuration (16GB) costs about RM 2199. It should be cheaper if you are able to buy outright from Google Play Store. But the price in Malaysia is much higher. However, iPhone's price is regulated by Apple around the world. Thus, Nexus 4 became an affordable device for many consumers. But it seems LG have problems in stocking the device in the market. After two months, many countries still suffer the lack of stocks.

Hardware - Size Does Matter

Although Nexus 4 boasts a slightly bigger pixel resolution 1280x760, it has a lower 318 ppi density with a 4.7 inch display (iPhone 5 has 326 pp with 4 inch retina display). Nexus 4 is slightly heavier. As for me the, the weight is not much of a problem, but the size is not meant to hold with one hand. I wondered why many people love the 5-inch smartphones that will be coming out soon. I have tried the Galaxy Note and its too big to be a smartphone and too small to become a good tablet (even though they called it a "phablet" and in the end it didn't give me any advantage). The 4.7 inch size is good enough to fit in my trouser's pocket and comfortable to be use with two hands but its quite a troublesome for me to reply any message or browse using one hand.

Operating System - iOS Killer

Jelly Bean 4.2.1 has matured and become a competitive contender for iOS 6. It has evolved with various features and giving more controlled to their apps. iOS 6, however, felt almost the same as iOS 5 and its previous iOS. The GUI doesn't change very much. Jelly Bean and the previous Android OS had a very close integration with almost all social media. As a social media freak, I love the way that I can posts almost anything to my favourite Social Media sites without opening another application to do this.
Smooth like a "butter" that's what users said about Jelly Bean. True enough, moving around Nexus this time is much smoother. I used to say that manoeuvring around an Android OS is like "getting lost in the jungle"... but no longer having this problem with Jelly Bean.

Applications - No Difference

I began to wonder what applications iOS have which does not exist in Android? Almost all my favourite apps now existed in Android. Thus, I don't feel lost when I am using Nexus 4. I can almost abandon my iPhone 5 and bring this device as my primary device.

User Control - That's the Success Factor

As a normal user, an iPhone would be the best because it does not require further customisation. If you require to tweak the system further, a Jailbreak is required but with the latest development from Dev Team, it seems an Untethered Jailbreak for iPhone 5 iOS 6 is very far from sight. Personally, I got bored very fast when i can't do much to my phone. I want my mind to be challenge, thus, an Android device give me the ability for the user to hack them. On my second day, I quickly unlocked and rooted the device. However, I refrained from flashing any custom ROMs as for now. Mainly because I wanted the latest Android updates from Google (and this is the main reason why I chose Google's Nexus 4 compared to the likes of Samsung or HTC).

Conclusion?

Its a tough decision but I began to believe that I can carry either iPhone 5 or Nexus 4 as my Primary smartphone. The only reason why I did not use Nexus 4 as my Primary now is because I only subscribed a data plan sim card recently for my Nexus 4 (initially I thought of carrying two devices everywhere). Now .. I began to wonder... Let's wait for my next update either a couple of weeks or months and see what happens...

Saturday, January 26, 2013

[How-To] - Root Nexus 4 Device (Another Guide)


  1. First you have to turn off your device and enter your phone into Bootloader Mode. To do this press the volume up, volume down, and power button all at the same time. When the Phone vibrates leave the power button but keep holding onto the volume up and down button. 
  2. Now you are on the Bootloader mode, plug the USB cable with your device to unlock the bootloader of Nexus 4. 
  3. Download and extract RootNexus4.zip on your Windows Desktop. 
  4. Now its time to Download USB driver on your PC. Download USB driver here and install it on your PC. And do check from device manager that the Driver are successfully installed or not. 
  5.  Now open command prompt on your Windows And desktop and type these commands one by one.  
cd Desktop
cd RootNexus4
fastboot oem unlock
 
  1. No time to go to your phone, press the volume up and power button to unlock bootloader of your Nexus 4. 
  2. Now to your Windows PC and and type: fastboot flash recovery recovery-clockwork-6.0.1.9-mako.img on your Command prompt windows 
  3.  Now Select the power button on your phone. Since we just flashed ClockworkMod Recovery we automatically entered into ClockworkMod Recovery for the first time. 
  4. Now its time to select “wipe data/factory reset” on your device, then select “yes”. Now Click on Back option choose “reboot system now”. 
  5. Once your Nexus 4 booting up transfer “CWM-SuperSU-v0.98.zip” file on your device with USB cable, you can get this file on your RootNexus4 folder that you downloaded on Step 3. 
  6. Now its time to go back to ClockworkMod Recovery Mode and unplug your device from USB cable. Press the volume up, volume down, and power button all at the same time. When your phone vibrates let go of the power button, but keep holding onto the volume up and down button. Now Press volume up 2x and power button to enter into “ClockworkMod Recovery Mode” mode. 
  7. Now you have to install the “CWM-SuperSU-v0.98.zip” on your device. Select “install zip from sdcard” then, “choose zip from sdcard”. 
  8. Go into “0/” folder and select “yes” after tapping on “CWM-SuperSU-v0.98.zip”. 
  9. After the installation is complete, hit Go back option on your device and tap on “reboot system now”. 
  10. Now you Nexus 4 is rooted. To make sure you have correctly followed the above root method and it’s working, verify with Root Checker Android app.

[How-To] - Install Custom ROM/kernel


[Source: Lowyat.net]

Download the rom you'd like to try on your device. Most roms also required you to install "gapps" as well. You can find the correct ones for the rom you're using in the ROM thread.

Make sure the ROM and Gapps are on your virtual SD card directory.
 Now, open Google Wallet (if you have it installed) and press Options > Settings > Reset Google Wallet. This will prevent the "Secure Element" errors some users have experienced.

Boot into ClockworkMod Recovery by turning your device completely off. Hold volume up, volume down, and power until the green Android with the open chest is displayed.
Navigate to "Recovery Mode" with the volume buttons and select using the power button.

Remember to have a recent nandroid before continuing! Navigate to "wipe data/factory reset" and select it. Select "yes." Wait for the process to complete. This may take some time.

Be patient! Once complete: Navigate to "Install Zip from SD card" and "Choose zip from SD card." Find the rom's .zip and install it.

Once that completes install any applicable gapps' .zip. Select the "Reboot" option.

Congratulations! Your phone should now boot into the custom rom!
Follow the prompts to re-activate your phone.

If you have not Unlock and Root the device, follow the below procedures...

[Part 1 - Profesional Way to Unlock & Root] - Prerequisite
[Part 2 - Profesional Way to Unlock & Root] - Unlocking the Bootloader
[Part 3 - Profesional Way to Unlock & Root] - Root

[Part 3 - Profesional Way to Unlock & Root] - Root


[Source: Lowyat.net Forum]

Obtaining Root Access and Custom Recovery:
Turn on USB Debugging: To do so; you must first go to Settings>About>Build Number and click seven times.
The actual setting can then be found in Settings>Developer Options>USB Debugging SuperSU(CWM .zip)
CWM (Pick the version for your device) 

Place the recovery-clockwork-VERSIONNUMBER-mako.img file into your C:\android-sdk-windows\platform-tools folder.
Put the SuperSU.zip on your phone.
Open another Command Prompt if it isn't still open. (Navigate to C:\android-sdk-windows\platform-tools and shift + right click. Select "Open Command Window Here.")
With your phone plugged in type:
adb reboot bootloader (Hit Enter)
And wait for your phone to boot into the android again.

Now type: fastboot flash recovery IMAGENAME.img
(Change the file name to the correct file name and Hit Enter)
Once that is finished: select the "Recovery Mode" option again on your phone.
You should get a new recovery menu here. Select "install zip from sd card" and "choose zip from sd card."
Find the SuperSU.zip that you transferred earlier and select "Yes" to installing.

Navigate back to "Reboot" and reboot your phone. You're now rooted!
However, ClockworkMod Recovery won't continue to load after this.
To fix this, find "Rom Manager" from the market. (The free version is fine.)
Use the "Flash ClockworkMod Recovery" option.

If your recovery still doesn't stick around after a reboot, you have another couple options.
Find a file explorer that allows root access, such as Root Explorer.
Use this program to rename /system/etc/install-recovery.sh to /system/etc/install-recovery.bak.
You'll need to mount the system as r/w to do this.
Root Explorer provides a button at the top to do so. Or, you can do this completely manually by firing up ADB again and running a few commands:

CODE
adb shell
(Hit Enter)
su
(Hit Enter)
mount -o remount,rw -t ext4 /dev/block/mmcblk0p1 /system
(Hit Enter)
mv /system/etc/install-recovery.sh /system/etc/install-recovery.bak
(Hit Enter) 

Congratulations! Your phone is now unlocked, rooted, and has a custom recovery!

***I take no responsibility for what happens to your phone due to following this guide! That being said, not only am I sure you'll be fine...but there are an endless amount of users who would be glad to help if you need it.***

[Part 1 - Profesional Way to Unlock & Root] - Prerequisite
[Part 2 - Profesional Way to Unlock & Root] - Unlocking the Bootloader
[Part 3 - Profesional Way to Unlock & Root] - Root

[Part 2 - Profesional Way to Unlock & Root] - Unlocking the Bootloader


[Source: Lowyat.net Forum]

***NOTE***This may perform a factory reset on your device. You will lose all your APPS & DATA. Even the data on your SD Card! I'd recommend making a Backup to your computer BEFORE performing this.

Get the drivers
Uninstall any previously attempted drivers if they don't work and move to the next.
Option One: Steps 16-27.
Option Two: Try this one as well. Use CyanogenMod's Guide for installing ADB - Steps 16 through 27 replacing the file/location with the naked drivers.
PDAnet's drivers may work if the above options don't. Simply install PDAnet (after uninstalling any previous attempted driver installations) to get the drivers.

While that is downloading, on your Nexus 4: turn USB debugging on.
To do so; you must first go to Settings > About > Build Number and click seven times.
The actual setting can then be found in Settings > Developer Options > USB Debugging

Once the drivers are installed, navigate to the C:\android-sdk-windows\platform-tools folder on your computer.
Hold shift and right click. Select "Open Command Window Here."
On your phone: turn USB Debugging On. To do so; you must first go to Settings > About > Build Number and click seven times.
The actual setting can then be found in Settings > Developer Options > USB Debugging
Plug your phone into the computer. Now in this command window type:

CODE
adb reboot bootloader (Hit Enter)
Your phone should now boot into a screen with a green android with his chest exposed.
Type this:
fastboot oem unlock (Hit Enter) 

If your Command Prompt displays the message "waiting for device" your driver wasn't successfully installed. Close the Command Prompt window and open Device manager while your phone is still plugged in. (Search for it using the search option).

Right Click the "Android" option and select Update Driver. Choose to "Browse My Computer" and "Let Me Pick From A List." Pick the Driver with the newest date and install it. Now retry the code above. Your phone will ask if you want to unlock it. Select "Yes" by using the volume keys and use power to select it. Now, navigate to "Recovery Mode" with the volume keys. Use power to select.

A screen with another Android will pop up. Press Volume Up and Power at the same time. Select Factory Reset. This process may take a few minutes. Be patient and let it work. Once finished, select "Reboot."

 Your phone is now unlocked!


[Part 1 - Profesional Way to Unlock & Root] - Prerequisite
[Part 2 - Profesional Way to Unlock & Root] - Unlocking the Bootloader
[Part 3 - Profesional Way to Unlock & Root] - Root

[Part 1 - Profesional Way to Unlock & Root] - Prerequisite


[Source: Lowyat.net Forum]

*This part of the tutorial is geared towards Windows users. The MAC instructions are very similar. Install the package the same way. All ADB/Fastboot commands may need to start with "adb-mac" (no quotes) rather than "adb" (no quotes). Due to the vast amount of Linux distros available; instructions will vary for your device. Once ADB/Fastboot are set up all command will begin with "./adb" (no quotes) rather than "adb" (no quotes). Once ADB/Fastboot are set up; this guide is relevant to everyone.

* Setting up ADB
Download AndroidSDK
Note: Google changes their mind every other week as to if this will be distributed as a .zip or an .exe. If you get an .zip file, simply extract the contents to your C:\ drive.
For an .exe install it like you would any other program, but set the path directly to the C:\ drive when the installer asks.

Or...you can use this page to download the "ADB for Dummies AIO App." This will automatically install ADB for you to your C:\ directory. It's very simple this way.

If your platform-tools folder doesn't have a fastboot.exe, place this fastboot.exe file in your C:\android-sdk-windows\platform-tools (or possibly simply called tools, if you set up ADB ages ago) folder.

Now you have ADB installed! Congratulations.


[Part 1 - Profesional Way to Unlock & Root] - Prerequisite
[Part 2 - Profesional Way to Unlock & Root] - Unlocking the Bootloader
[Part 3 - Profesional Way to Unlock & Root] - Root

Friday, January 25, 2013

[How-To] - Recover Dead Android with Red Exclamation Mark


I tried to Root my 1-day old Nexus 4 using this method but stopped with the symbol of the Dead Android with the Exclamation mark.
Finally, I found a Youtube that helped to Root the Nexus 4 without any glitch.

[How-To] - Root Nexus 4 on Mac OSX!

I have tried other methods but this save my life! Thanks!
My Nexus 4 is now rooted!


↵ Use original player
← Replay
X
i

[How-To] - Root Nexus 4

Root Android 4.2.1 On Nexus 4, 7, 10 And Galaxy Nexus [How-To Tutorial] | Redmond Pie

[How-To] - Galaxy Nexus in Fastboot mode

The LG Google Nexus 4 must be rooted especially if you want to take full advantage of its performances. As you might know, when you first buy a handset, it will be delivered with a locked system with many factory restrictions installed. Therefore, it is your job to unlock the Nexus 4. Of course you should start by unlocking the bootloader and then continue by gaining root access over the operating system. In this way you will be able to have access to the internal files of your phone, not to mention that once you succeed with the rooting procedure, you will be able to customize and optimize the performances of your Nexus 4.

This will be my first step-by-step tutorial to learn how to Root my Nexus 4.
I will be posting some videos showing the necessary steps for Rooting.


↵ Use original player
← Replay
X
i

The Predictive Keyboard of jelly bean Nexus 4 is far intelligent than iOS.

Thursday, January 24, 2013

Review - Unboxing of my New Nexus 4


↵ Use original player
← Replay
X
i

[Purchased] - My Nexus 4 (Jan 24, 2013)

I should have bought this yesterday (Jan 23, 2013), since its my Birthday but unfortunately the Stocks arrived late in the evening. Thus, no time to go to Hotspot Low Yat. Only managed to get this today at 11.00 am.


Wednesday, January 23, 2013

2nd Batch Nexus 4 Arrived (Malaysia) Today! (Wed. Jan 23, 2013)

Hotspot Malaysia Facebook just updated their status - The 2nd batch of stock just arrived today!
Yeay! For those who have pre-ordered can get their now.


Monday, January 21, 2013

Nexus 4 New Batch in Malaysia to Arrive - Tuesday 22 jan. 2013

The next pre-order (2nd batch) is expected to arrive on Tuesday. And for the people who have made the pre-order will be inform by Hotspot Malaysia today (Monday) as reported in Hotspot Facebook.


Friday, January 18, 2013

[Cheap] - USB Sync Data/Charging Lightning Cable for iPhone 5


 Ordered via Dealextreme on Jan 9
Arrived today on Jan 18
That's about 10 days - very fast!
Price of the USB Sync Data/Charging Lightning Cable: USD 4.30 per item (RM 13.00). This is very cheap as compared to the original cable from Apple.
Bought 3 units = USD 12.90 (RM 39.00)

Apple Store = RM 69.00 each


Monday, January 14, 2013

Nexus 4 Launched in Malaysia Today (Jan. 14, 2013) at Hotspot

Hotspot Malaysia in Low Yat Plaza released the 1st batch of Nexus 4 customers who made the pre-order a couple of weeks back.


Friday, January 11, 2013

The Google Nexus 4 is here in Malaysia!

@StringfellowLYN tweeted this...


And here's the Nexus 4!!


Hotspot requested their 1st pre-order customers to reconfirm their purchase status. Otherwise, they will pass their pre-order to someone else.
I only managed to SMS Hotspot yesterday and get this response.


Thursday, January 10, 2013

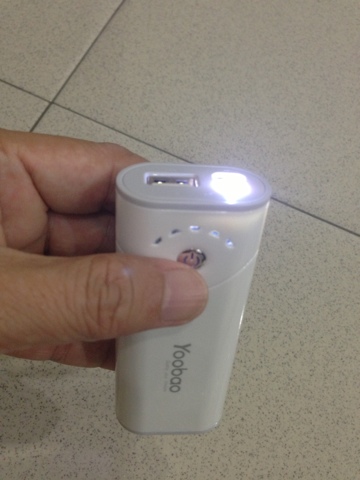
[Arrived] - Powerbank Yoobao YB622 5200 mAh Powerbank

I wanted an external battery charger that is powerful but yet portable enough to carry around in the pocket. I already have Yoobao 11200 mAh model - even though its very powerful but to big to carry around.
I think I have found the perfect one which is easily available and good quality - YB622 from Yoobao (USD 31.89 with free shipping via eBay Malaysia).
Shipped on 25 Dec and arrived on 10 Jan.
About 16 days including the Xmas and New Year's holidays!
Reasonably fast for free shipping!!

NOTE: There is another way to get this at USD 36.90 from Dealextreme.


Tuesday, January 8, 2013

[Arrived] - Gear Pouch from Waterfield Designs

Purchased the Medium Gear Pouch $22.
It came together with my Portable Muzetto today.


Monday, January 7, 2013

[Arrived] - Review Portable Muzetto from Waterfield Designs

Finally arrived today from Pos Laju.
Expected to arrive last Friday.


The bag fits both my iPad Mini and New iPad very nicely. Either you place the iPad Mini in the main compartment or the back/front pocket.


It has ample pockets for your iPhone too.
And I love the smell of the leather!


ShareThis

LinkWithin

Related Posts Plugin for WordPress, Blogger...